 搭建Verdaccio-npm本地仓库
# 一、搭建Verdaccio NPM私服

# 二、npm私服是什么
- 在自己的服务器上部署一个支持发布、下载、版本管理等服务的npm仓库就是npm私服,也叫私有化部署npm

因为国内下载
npm包特别慢甚至下载失败,所以安装完node.js还要设置镜像源,镜像源就属于私服的一种镜像源: 是以一定频率定时同步`npm``官方仓库,以此代替官方仓库,提高包下载速度
npm config set registry https://npmmirror.com
- 淘宝镜像源 npmmirror.com (opens new window)
- 腾讯镜像源 mirrors.cloud.tencent.com/npm/ (opens new window)
- 华为镜像源 mirrors.huaweicloud.com/repository/… (opens new window)
# 有了镜像源为什么还需要npm私服?
- 1.镜像源解决了国内下载速度的问题,但是不能发包
- 2.私有组件库,又不希望在网上公开,如何管理代码?
- 3.在每个项目里复制一遍,但是当组件修改了代码,就需要重新复制一遍, 带来的维护成本太高
此时就需要npm私服
# 三、npm私服有什么用
# 发布私有包
- 私服最重要的功能就是发布私有包,既能保证代码不公开又能享受
npm安装的快捷
例如
- 在开发中通常会把一些方法封装成
utils.js,在项目初始化时复制一份 - 有了私服后就可以发一个
myUtils包,然后通过npm install myUtils来安装 - 通过修改版本号就能快速更新包
# 链接npm仓库
在一个项目中使用多个仓库下载包时,可以配置 .npmrc 指定下载地址
vue包从淘宝镜像源下载myUtils包从私服下载
.npmrc` 需要配置两个包的下载地址,还要在 `package.json` 中将私有包 `myUtils` 加上组织名 `@sf/myUtils
# 淘宝镜像源
registry=https://npmmirror.com
# 私有源
@sf:registry=http://...
2
3
4
5
其他项目组有自己的仓库的情况下,又要用到它们的包,只好再次修改
.npmrc
解决办法
- 使用私服的仓库链接功能(上行链路),就可以把多个仓库聚合成一个下载入口
- 上面的例子
.npmrc只需要配置一个私服的地址registry=http://... - 省事省力

# 提高下载速度
通过私服下载的包会缓存到服务器中
下载同一个包(同组织/名/版本)时优先从缓存中读取,找不到再从镜像或官方仓库下载
缓存策略可配置存储空间大小,保存周期等
# 四、私服方案
# 开源免费
| 方案 | 支持仓库 | star数 | github | 开发语言 | 更新频率 |
|---|---|---|---|---|---|
Nexus开源版 | maven,npm,docker,pypi... | 1.2k | nexus-public (opens new window) | Java | 高 |
Sinopia | npm | 5.5k | sinopia (opens new window) | JavaScript | 停止更新 |
Verdaccio | npm | 13.7k | verdaccio (opens new window) | JavaScript | 高 |
cnpm.org | npm | 3.6k | cnpmjs.org (opens new window) | JavaScript | 停止更新 |
cnpmcore | npm | < 500 | cnpmcore (opens new window) | TypeScript | 高 |
Sinopia停止更新后,社区大佬fork了一份并更名为**Verdaccio**cnpm.org停止更新后,团队使用TypeScript重构并新建了**cnpmcore** 仓库,目前star数并不高
所以可选的开源方案并不多,目前最受社区欢迎的就**Verdaccio,Nexus** 两个

# 收费方案
JFrog Artifactory号称是 "最好的通用存储库管理器",支持docker、npm、maven、pypi等50多种仓库- 官网 (opens new window)
# 五、为什么推荐Verdaccio
verdaccio 6已经在开发中,注意关注动态
很多团队使用Nexus,原因是Nexus同时支持Maven、npm仓库
从npm命令的角度二者差异不大,支持npm的多数命令,那为什么推荐Verdaccio呢?
# npm命令
截止到
5.15.3版Verdaccio支持以npm命令
| 功能 | 命令 | 是否支持 |
|---|---|---|
| 安装包 | npm install、npm upgrade | ✅ |
| 发布包 | npm publish | ✅ |
| 取消发布 | npm unpublish | ✅ |
| 标记 | npm tag | ✅ |
| 弃用 | npm deprecate | ✅ |
| 注册用户 | npm adduser {newuser} | ✅ |
| 令牌 | npm token | ✅ |
| 转让包 | ❌ | |
| 搜索 | npm search | ✅ |
| ping | npm ping | ✅ |
| 加星 | npm star、npm unstar、npm stars | ✅ |
| 审计 | npm audit | ✅ |
# 理由1

二者最大的差异在于Web界面上
Verdaccio显示了包名、描述、作者、版本、标签、更新时间、协议等信息,更接近npm官方界面Nexus上的信息则少的多- 这是因为
Nexus是一款综合仓库管理系统,不仅支持npm,还有maven,pypi等仓库,对包的信息处理就没有Verdaccio直观
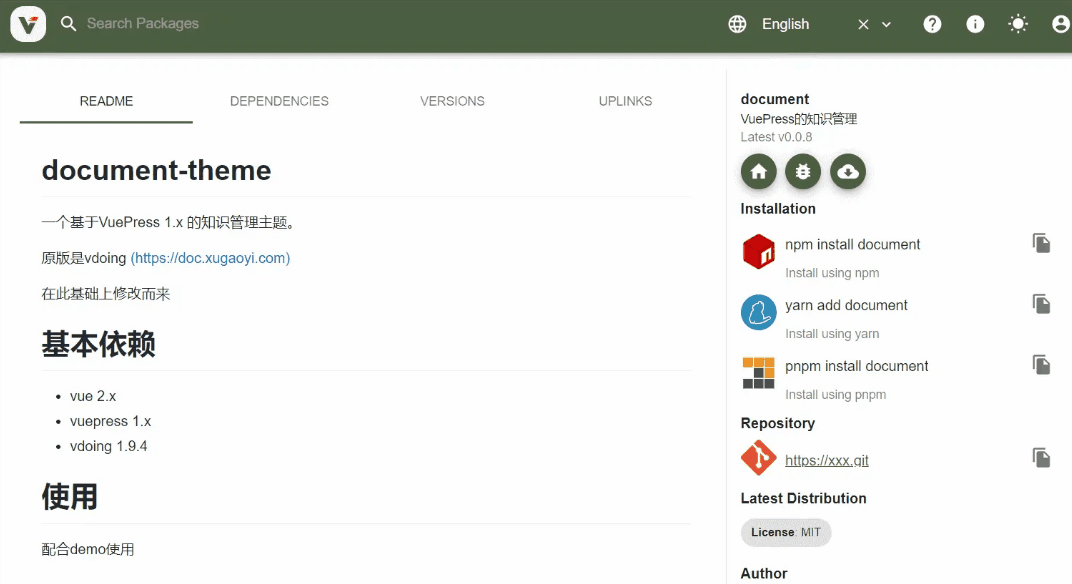
Verdaccio
- 提供各类包管理器
npmyarnpnpm的安装命令,一键复制 - 直接将
README.md渲染到页面上,不用再去git上翻README - 查看依赖包,点击跳转到对应包的详情页
- 历史版本
- 上行链路,这就是前面说的 链接npm 仓库(图中没有配置
UPLINKS) - 右上角包括仓库信息、登录,还有夜间模式等

Nexus
Nexus需要先选版本再查看详情npm包信息内容与Verdaccio不同,展现形式也完全不一样Nexus像一个 “字典”,把所有重要信息罗列出来,Verdaccio像一个 “工具” ,用起来更顺手
# 理由2
安装简单
- 支持
npm 、Docker镜像、Helm Chart、Cloudron多种安装方式,一行命令即可安装
身份验证
- 内置账号注册,登录功能(默认使用
htpasswd),可通过插件扩展LDAP等验证方式
权限控制
- 根据需要允许和限制对某个包的访问、下载
上行链路
- 支持多个关联多个
npm仓库
Webhooks
- 通过
npm publish发布包时,可发送通知
日志
- 详细的日志记录
插件支持
官方支持认证、中间件、存储、主题,4种类型插件,可根据需求自己开发插件,官网提供了详细的开发文档
# 六、从零开始搭建
# 安装docker
- 使用
yum-utils管理yum仓库
# 安装yum-utils
yum install -y yum-utils
2
- 添加
docker的`yum源
# 添加docker-ce源
yum-config-manager --add-repo http://mirrors.aliyun.com/docker-ce/linux/centos/docker-ce.repo
# 更新yum缓存
yum --enablerepo=updates clean metadata
2
3
4
- 安装
docker docker-compose并运行
# 安装
yum -y install docker-ce docker-ce-cli docker-compose
# 启动
systemctl enable docker && systemctl start docker
2
3
4
如果提示 找不到
docker-compose试试: 先执行
yum -y install epel-release在执行安装命令
# 配置docker镜像源
已经配置过的直接下一步
# docker配置文件夹
mkdir /etc/docker

# 编辑配置文件
## 修改 registry-mirrors 和 dns 配置
cat > /etc/docker/daemon.json <<EOF
{
  "registry-mirrors": [
    "https://docker.mirrors.ustc.edu.cn",
    "https://hub-mirror.c.163.com",
    "https://reg-mirror.qiniu.com"
  ],
  "dns": ["114.114.114.114","8.8.8.8"]
}
EOF

# 重启docker
## 重启配置
systemctl daemon-reload

## 重启docker
systemctl restart docker
2
3
4
5
6
7
8
9
10
11
12
13
14
15
16
17
18
19
20
21
22
# Verdaccio容器配置
安装共需要3个文件
docker-compose.yaml docker容器配置config.yamlverdaccio配置文件htpasswd用户密码文件
# 数据目录结构

└── /data/verdaccio # 项目目录
   ├──/conf 配置目录
   │  └── config.yaml # verdaccio 配置文件
   │  └── htpasswd # 用户密码文件
   │
   ├──/storage # 包存放目录
   │
   └──/plugins # 插件目录

    docker-compose.yaml # docker-compose 配置文件
2
3
4
5
6
7
8
9
10
11
12
1.首先创建**docker-compose.yaml**文件
docker-compose是定义和运行docker容器的工具,通过.yaml文件配置容器
# 创建目录
mkdir -pv /opt/scripts/verdaccio

# 创建yaml文件
cat > /opt/scripts/verdaccio <<EOF
version: '3.1'
services:
  verdaccio:
    image: verdaccio/verdaccio:5.18
    container_name: "verdaccio"
    hostname: jenkins
    restart: always
    privileged: true
    environment:
      - VERDACCIO_PORT=4873
      - TZ="Asia/Shanghai"
    ports:
      - "4873:4873"
    volumes:
      - "/data/verdaccio/storage:/verdaccio/storage"
      - "/data/verdaccio/conf:/verdaccio/conf"
      - "/data/verdaccio/plugins:/verdaccio/plugins"
EOF
2
3
4
5
6
7
8
9
10
11
12
13
14
15
16
17
18
19
20
21
22
23
24
25
version: docker对应版本号 (opens new window)image:verdccio镜像- 三个
4873是verdaccio访问端口号 volumes: 是挂载物理机的目录到docker中- 第一行: 存储目录,用于保存
npm包 - 第二行: 配置文件目录,下一节
Verdaccio配置 会讲解 - 第三行: 插件目录
- 第一行: 存储目录,用于保存
# htpasswd配置
# 安装依赖工具
yum install apache2-utils httpd -y


# 创建账户
## -n:Don't update file; display results on stdout //不更新文件;在标准输出上显示结果
## -b:Use the password from the command line //从命令行使用密码
## -m:Force MD5 encryption of the password //强制对密码进行MD5加密
$ htpasswd -nbm admin hhrR@WJbw@Y5dUVnJcYwaJUJ5teR9nn
admin:$apr1$5YfRsb5f$ADC8LIX3nRxfh/wdjtq.w/

# 命令行上会打印出对应的加密后的账户信息"admin:$apr1$wYbiTV5U$ZdhMVrmkUmFHOik1wJqdx.",将其写到/data/verdaccio/conf/htpasswd中
echo "admin:\$apr1\$wYbiTV5U\$ZdhMVrmkUmFHOik1wJqdx." > /data/verdaccio/conf/htpasswd
2
3
4
5
6
7
8
9
10
11
12
13
# Verdaccio配置
官网配置文档: verdaccio.org/zh-cn/docs/… (opens new window)
创建配置文件
config.yamlVerdaccio的配置文件,上行链路、插件、密码文件位置等等参数都通过config.yaml配置
cat > /data/verdaccio/conf/config.yaml <<EOF
# npm包缓存目录
storage: /verdaccio/storage
# 插件目录
plugins: /verdaccio/plugins
# 密码文件
auth:
  htpasswd:
    file: /verdaccio/conf/htpasswd
# 上行链路
uplinks:
  npmjs:
    url: https://registry.npmjs.org
    timeout: 10s
    cache: false
  yarn:
    url: https://registry.yarnpkg.com
    timeout: 10s
    cache: false
  npmmirror:
    url: https://registry.npmmirror.com
packages:
  # 带@的包只能登录后发布
  "@*/*":
    # 访问包的权限
    access: \$all
    # 发布包的权限
    publish: \$authenticated
    # 代理链
    proxy: npmjs npmmirror yarn
  # 普通包所有人都能发布
  "**":
    access: \$all
    publish: \$all
    proxy: npmjs npmmirror yarn
middlewares:
  # 启用 npm audit
  audit:
    enabled: true
logs:
  - { type: stdout, format: pretty, level: http }
#监听端口
listen: 0.0.0.0:4873
# 解决前端域名访问无法获取到后端Verdaccio的js内容
i18n:
  web: en-US
EOF

$ dos2unix /data/verdaccio/conf/config.yaml
$ chmod -R  0755 /data/verdaccio
2
3
4
5
6
7
8
9
10
11
12
13
14
15
16
17
18
19
20
21
22
23
24
25
26
27
28
29
30
31
32
33
34
35
36
37
38
39
40
41
42
43
44
45
46
47
48
49
50
在packages中共有三种用户角色
| 角色 | 描述 |
|---|---|
| $all | 所有用户 |
| $anonymous | 匿名用户 |
| $authenticated | 登录的用户 |
在packages中可以定义某个包的发布下载规则
网站的标题、Logo等设置参考github web字段
配置文件错误
状态如下
# 前端访问日志输出
verdaccio  |  http --- 172.31.228.152 requested 'GET /'
verdaccio  |  http --- 200, user: null(170.178.169.99 via 172.31.228.152), req: 'GET /', bytes: 0/0
verdaccio  |  http --- 172.31.228.152 requested 'GET /'
verdaccio  |  http --- 200, user: null(170.178.169.99 via 172.31.228.152), req: 'GET /', bytes: 0/0
verdaccio  |  http --- 172.31.228.152 requested 'GET /'
verdaccio  |  http --- 200, user: null(170.178.169.99 via 172.31.228.152), req: 'GET /', bytes: 0/0
verdaccio  |  http --- 172.31.228.152 requested 'GET /'
verdaccio  |  http --- 200, user: null(170.178.169.99 via 172.31.228.152), req: 'GET /', bytes: 0/0
verdaccio  |  http --- 172.31.228.152 requested 'GET /'
verdaccio  |  http --- 200, user: null(170.178.169.99 via 172.31.228.152), req: 'GET /', bytes: 0/0
verdaccio  |  http --- 172.31.228.152 requested 'GET /'
verdaccio  |  http --- 200, user: null(170.178.169.99 via 172.31.228.152), req: 'GET /', bytes: 0/0
verdaccio  |  http --- 172.31.228.152 requested 'GET /'
verdaccio  |  http --- 200, user: null(170.178.169.99 via 172.31.228.152), req: 'GET /', bytes: 0/0
1
2
3
4
5
6
7
8
9
10
11
12
13
14
15前端域名访问无法获取到
Verdaccio后端的JS文件
# 创建容器并启动
# 进入verdaccio目录
cd /verdaccio

# 执行以下命令
docker-compose up -d
docker-compose logs --tail 100 -f
docker-compose ps
2
3
4
5
6
7
# Nginx代理Verdaccio
vim /etc/nginx/conf.d/verdaccio.com.conf
server {
    charset utf-8;
    listen 80;
    server_name verdaccio.chsaos.com;

    location / {
        rewrite ^(.*) https://$host$1 permanent;
    }
}

server {
    listen                  443 ssl http2;
    server_name             verdaccio.chsaos.com;

    ssl_certificate         ssl/chsaos.com.crt;
    ssl_certificate_key     ssl/chsaos.com.key;

    ssl_session_cache       shared:SSL:10m;
    ssl_session_timeout     10m;

    ssl_prefer_server_ciphers on;
    ssl_dhparam 			ssl/dhparam.pem;
    ssl_protocols           TLSv1 TLSv1.1 TLSv1.2;
    ssl_ciphers     EECDH+CHACHA20:EECDH+AES128:RSA+AES128:EECDH+AES256:RSA+AES256:EECDH+3DES:RSA+3DES:!MD5;

    add_header Strict-Transport-Security "max-age=31536000; includeSubDomains; preload" always;
    add_header X-Frame-Options DENY;
    add_header X-Content-Type-Options nosniff;
    add_header X-Xss-Protection 1;

    location / {
      proxy_pass          http://172.31.228.152:4873/;
      proxy_set_header Host $host;
      proxy_set_header X-Forwarded-Proto $scheme;
      proxy_set_header X-Forwarded-For $proxy_add_x_forwarded_for;
      proxy_set_header X-NginX-Proxy true;
      proxy_ssl_session_reuse off;
      proxy_set_header Host $http_host;
      proxy_redirect off;
    }
}

nginx -t
nginx -s reload
2
3
4
5
6
7
8
9
10
11
12
13
14
15
16
17
18
19
20
21
22
23
24
25
26
27
28
29
30
31
32
33
34
35
36
37
38
39
40
41
42
43
44
45
访问地址:
https://verdaccio.chsaos.com/

# 七、使用Verdaccio
# npm命令
# 配置私服地址
- 把私服地址配置到项目的
.npmrc即可
registry=https://verdaccio.chsaos.com/

npm set registry https://verdaccio.chsaos.com/
2
3
# 登录账户
$ npm login --registry https://verdaccio.chsaos.com/
Username: 注册的用户名;(注册用户名不能重复)
Password: 设置密码;
Email: 注册邮箱;(注册邮箱不能重复)
2
3
4
# 注册用户
$ npm adduser --registry https://verdaccio.chsaos.com/
Username: 注册的用户名;(注册用户名不能重复)
Password: 设置密码;
Email: 注册邮箱;(注册邮箱不能重复)
2
3
4
5
# 初始化项目
npm init
这里提示输入:
name:填写个包的名字,默认是这个文件夹的名字(npm有同名的包会报错);version:包的版本,默认是1.0.0;description:要封装的包的简单介绍;entry point:入口文件,默认是index.js,也可以是其它名字;test command:测试命令,直接回车;git repository:这个是git仓库地址,如果你的包是先放到github上或者其他git仓库里,这时候你的文件夹里面会存在一个隐藏的.git目录,npm会读到这个目录作为这一项的默认值。如果没有的话,直接回车继续;keyword:作为这个包的索引的关键字;author:作者名或账号;license:许可证, 没有就直接回车;
# 发布包
npm publish --registry https://verdaccio.chsaos.com/
# 下载项目
npm install 包名 --registry https://verdaccio.chsaos.com/
# 常用npm命令
# 查看 npm 的版本
npm -v

# 查看各个命令的简单用法
npm -l

# 查看 npm 命令列表
npm help

# 查看 npm 的配置
npm config list -l

# 初始化模块
npm init

# 设置环境变量
npm set

# npm search 搜索模块
npm search <搜索词> [-g]
npm search命令用于搜索npm仓库,它后面可以跟字符串,也可以跟正则表达式。

# 查看模块
npm list

# 列出全局安装的模块 带上[--depth 0] 不深入到包的支点 更简洁
npm list -g --depth 0

# 安装模块
npm install

# 默认安装指定模块的最新(@latest)版本
npm install [<@scope>/]<name>
例如:npm install test

# 安装指定模块的指定版本
npm install [<@scope>/]<name>@<version>
例如:npm install test@3.9.1

# 安装指定指定版本范围内的模块
npm install [<@scope>/]<name>@<version range>
例如:npm install test@">=1.0.28 < 2.0.0"

# 卸载当前项目或全局模块
npm uninstall <name> [-g]
例如: npm uninstall test --save-dev
     npm i test -g

# 升级当前项目或全局的指定模块
npm update <name> [-g]
例如: npm update express
     npm update express -g

# 引用依赖 有些包是全局安装了,在项目里面只需要引用即可。
npm link [<@scope>/]<pkg>[@<version>]
例如: 引用   npm link test test-ssh test-ftp
例如: 解除引用 npm unlink test

# 注册添加新用户
npm adduser
//执行后 填写几个问题 Username、Password、Email

#已注册
npm login

# 发布模块
npm publish (必须先登录再发布)

# 执行脚本
npm run
2
3
4
5
6
7
8
9
10
11
12
13
14
15
16
17
18
19
20
21
22
23
24
25
26
27
28
29
30
31
32
33
34
35
36
37
38
39
40
41
42
43
44
45
46
47
48
49
50
51
52
53
54
55
56
57
58
59
60
61
62
63
64
65
66
67
68
69
70
71
# Verdaccio命令安装
# 全局安装verdaccio命令
npm install -g verdaccio
2
3
Windows配置环境变量
verdaccio_cli


# 查看版本信息
$ verdaccio --version
v5.18.0

# 查看命令帮助
$ verdaccio --help
Launch the server

━━━ Usage ━━━━━━━━━━━━━━━━━━━━━━━━━━━━━━━━━━━━━━━━━━━━━━━━━━━━━━━━━━━━━━━━━━━━━━━

$ C:\Program Files\nodejs\node.exe D:\NodeJS\node_global\node_modules\verdaccio\bin\verdaccio

━━━ Options ━━━━━━━━━━━━━━━━━━━━━━━━━━━━━━━━━━━━━━━━━━━━━━━━━━━━━━━━━━━━━━━━━━━━━

  -l,--listen #0    host:port number to listen on (default: localhost:4873)
  -c,--config #0    use this configuration file (default: ./config.yaml)

━━━ Details ━━━━━━━━━━━━━━━━━━━━━━━━━━━━━━━━━━━━━━━━━━━━━━━━━━━━━━━━━━━━━━━━━━━━━

This start the registry in the default port.

When used without arguments, it:

- bootstrap the server at the port  `4873`

The optional arguments are:

- `--listen` to switch the default server port,

- `--config` to define a different configuration path location,

━━━ Examples ━━━━━━━━━━━━━━━━━━━━━━━━━━━━━━━━━━━━━━━━━━━━━━━━━━━━━━━━━━━━━━━━━━━━

Runs the server with the default configuration
  $ verdaccio

Runs the server in the port 5000
  $ verdaccio --listen 5000

Runs the server by using a different absolute location of the configuration file
  $ verdaccio --config /home/user/verdaccio/config.yaml
2
3
4
5
6
7
8
9
10
11
12
13
14
15
16
17
18
19
20
21
22
23
24
25
26
27
28
29
30
31
32
33
34
35
36
37
38
39
40
41
- 01
- kubernetes部署minio对象存储01-18
- 02
- Jenkins-Argocd CICD-下01-17
- 03
- Jenkins-Argocd CICD Rollouts金丝雀发布优化01-17